Hace rato tenía ganas de implementar Pi-hole en el entorno de laburo. ¿Por qué? Porque me parece una herramienta clave por varias razones:
- Podés bloquear anuncios a nivel de red (sí, todos los dispositivos de la LAN disfrutan de internet más limpio).
- Tenés métricas en tiempo real sobre el tráfico DNS: quién consulta qué, cuánto y cuándo.
- Si algún directivo en el futuro dice “che, ¿no se puede bloquear tal sitio?”, la respuesta es: sí papá, ya está todo listo.
Así que con eso en mente, arranqué a armar el entorno.
⚙️ Preparando el terreno
Me pasaron una máquina bastante gauchita y le metí Proxmox. Dentro, levanté una VM con Ubuntu Server y durante la instalación me preguntó si quería instalar Docker… ¡de una!
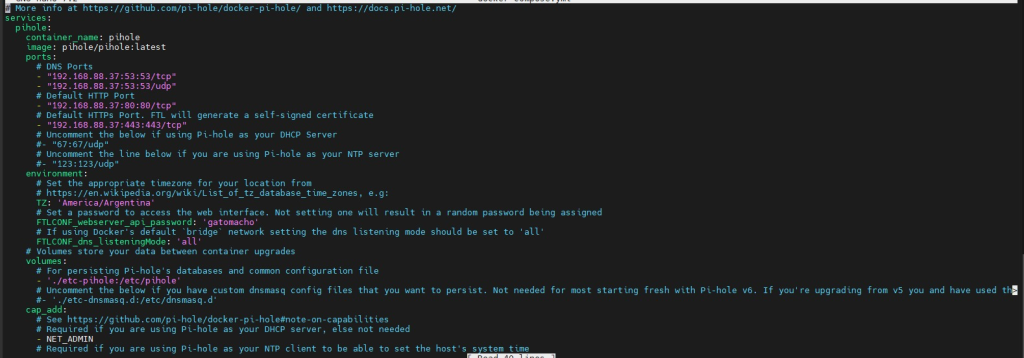
Una vez adentro de Ubuntu, fui a la doc oficial de Pi-hole para Docker y preparé el archivo docker-compose.yml con nano. Le cargué todos los parámetros necesarios, ajusté el timezone, las IPs, etc.,
# More info at https://github.com/pi-hole/docker-pi-hole/ and https://docs.pi-hole.net/
services:
  pihole:
    container_name: pihole
    image: pihole/pihole:latest
    ports:
      # DNS Ports
      - "53:53/tcp"
      - "53:53/udp"
      # Default HTTP Port
      - "80:80/tcp"
      # Default HTTPs Port. FTL will generate a self-signed certificate
      - "443:443/tcp"
      # Uncomment the below if using Pi-hole as your DHCP Server
      #- "67:67/udp"
      # Uncomment the line below if you are using Pi-hole as your NTP server
      #- "123:123/udp"
    environment:
      # Set the appropriate timezone for your location from
      # https://en.wikipedia.org/wiki/List_of_tz_database_time_zones, e.g:
      TZ: 'America/Argentina'
      # Set a password to access the web interface. Not setting one will result in a random password being assigned
      FTLCONF_webserver_api_password: 'que miras capo'
      # If using Docker's default `bridge` network setting the dns listening mode should be set to 'all'
      FTLCONF_dns_listeningMode: 'all'
    # Volumes store your data between container upgrades
    volumes:
      # For persisting Pi-hole's databases and common configuration file
      - './etc-pihole:/etc/pihole'
      # Uncomment the below if you have custom dnsmasq config files that you want to persist. Not needed for most starting fresh with Pi-hole v6. If you're upgrading from v5 you and have used this directory before, you should keep it enabled for the first v6 container start to allow for a complete migration. It can be removed afterwards. Needs environment variable FTLCONF_misc_etc_dnsmasq_d: 'true'
      #- './etc-dnsmasq.d:/etc/dnsmasq.d'
    cap_add:
      # See https://github.com/pi-hole/docker-pi-hole#note-on-capabilities
      # Required if you are using Pi-hole as your DHCP server, else not needed
      - NET_ADMIN
      # Required if you are using Pi-hole as your NTP client to be able to set the host's system time
      - SYS_TIME
      # Optional, if Pi-hole should get some more processing time
      - SYS_NICE
    restart: unless-stopped
y ejecuté:
docker compose up -d🚨 Problema inesperado
Cuando todo parecía funcionar… Pi-hole no levantaba.
Al tirar comando:
docker exec -it <nombre_contenedor> /bin/bashMostraba esto:

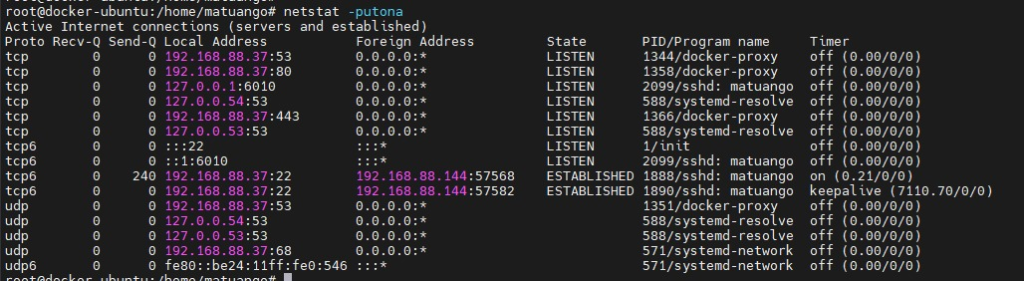
🧩 Diagnóstico
- Pi-hole necesita el puerto 53 (DNS).
- Ubuntu tiene corriendo
systemd-resolved, que escucha en127.0.0.53:53. - Resultado: conflicto de puertos y Pi-hole no puede iniciar ni recibir consultas.
🔧 Solución 1 – Funcional pero medio “a lo guapo”
Apagué systemd-resolvedcon:
systemctl stop systemd.resolver y edité /etc/resolv.conf para que use DNS externos:
nameserver 8.8.8.8
nameserver 1.1.1.1
Reinicié parámetros IP
networkctl down <nombre de la interfaz lan>
networkctl up <nombre de la interfaz lan>
Con eso volvió el internet en la VM y Pi-hole arrancó joya. Pero no me cerraba andar matando servicios del sistema como si nada…
💡 Solución 2 – Más elegante (ya implementada)
Una mejor práctica es hacer que Pi-hole escuche solo en la IP LAN de la VM:
Editar el archivo:
nano docker-compose.yml
Tendría que quedar algo asi modificando solo parte de ip y puertos:
Borramos el contenedor y lo volvemos a crear con compose, si el volume esta bien cargado, no se deberían perder los datos persistentes del contenedor.
docker rm <pi hole>
docker compose up -d
Ahora vemos a docker llevándose de 10 con systemd-resolved (no miren los flags que uso con netstat, es la unica forma que los he podido memorizar):
✅ Así:
systemd-resolvedsigue funcionando para la VM.- Pi-hole atiende a toda la LAN sin conflicto.
- No matás ningún proceso base del sistema.
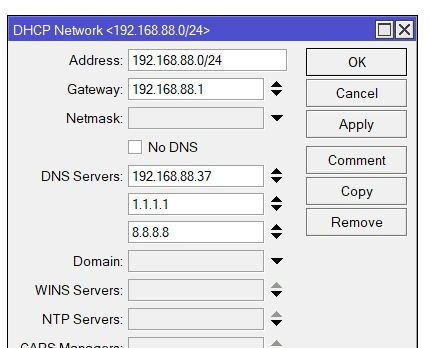
🌐 Configurando el DHCP
Una vez funcionando bien Pi-hole, fui al servidor DHCP (en mi caso, el router) y cambié la configuración para que el DNS principal sea la IP del Pi-hole. Así todos los dispositivos conectados empiezan a usarlo automáticamente.
¡Ojo! También dejé los clásicos 1.1.1.1 y 8.8.8.8 como secundarios, por si Pi-hole se cae, que la red siga funcionando y no se me venga nadie con antorchas.
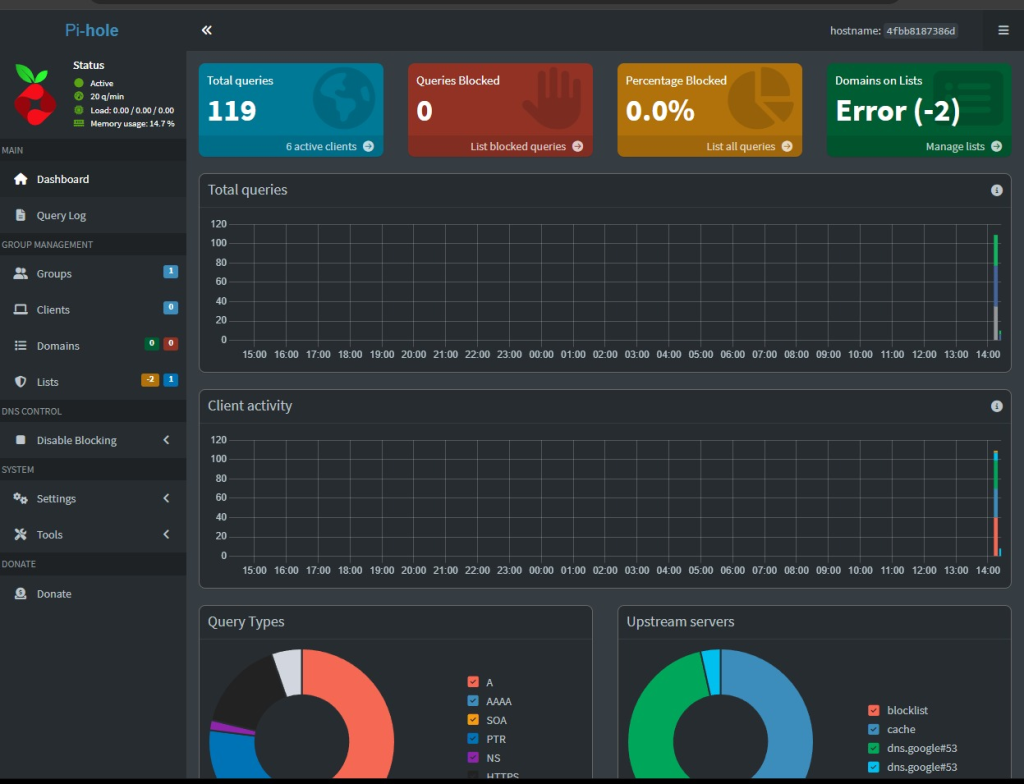
📊 Pi-hole en acción
Con todo configurado, abrí el dashboard web de Pi-hole y ahí estaban: las métricas en tiempo real, dominios bloqueados, clientes conectados, consultas por segundo… un golazo.
¿Y vos, qué esperás para meter un Pi-hole en tu red? ¿Lo tenés en una Raspi, en Docker, en una VM, o en una caja de cartón con cinta aisladora y una gallina picoteando maíz arriba del aparato?
Contame abajo y tirá tus tips. 👇